Print Ready Files Guide
Email Your Files To:
production@alphagrap.com
The Anatomy of a Print-Ready File
When setting up your files, run through the following checklist to ensure what you see is what we print!
PDF File
Make sure the file type is a PDF.
Correct Finished Size
Your design should be the measurements you want the final print to be.
Image Quality
Check for sharp, high resolution images with 300 pixels-per-inch at the final printed size.
Color Settings
File should be exported in CMYK for color accuracy. RGB files may experience color dulling.
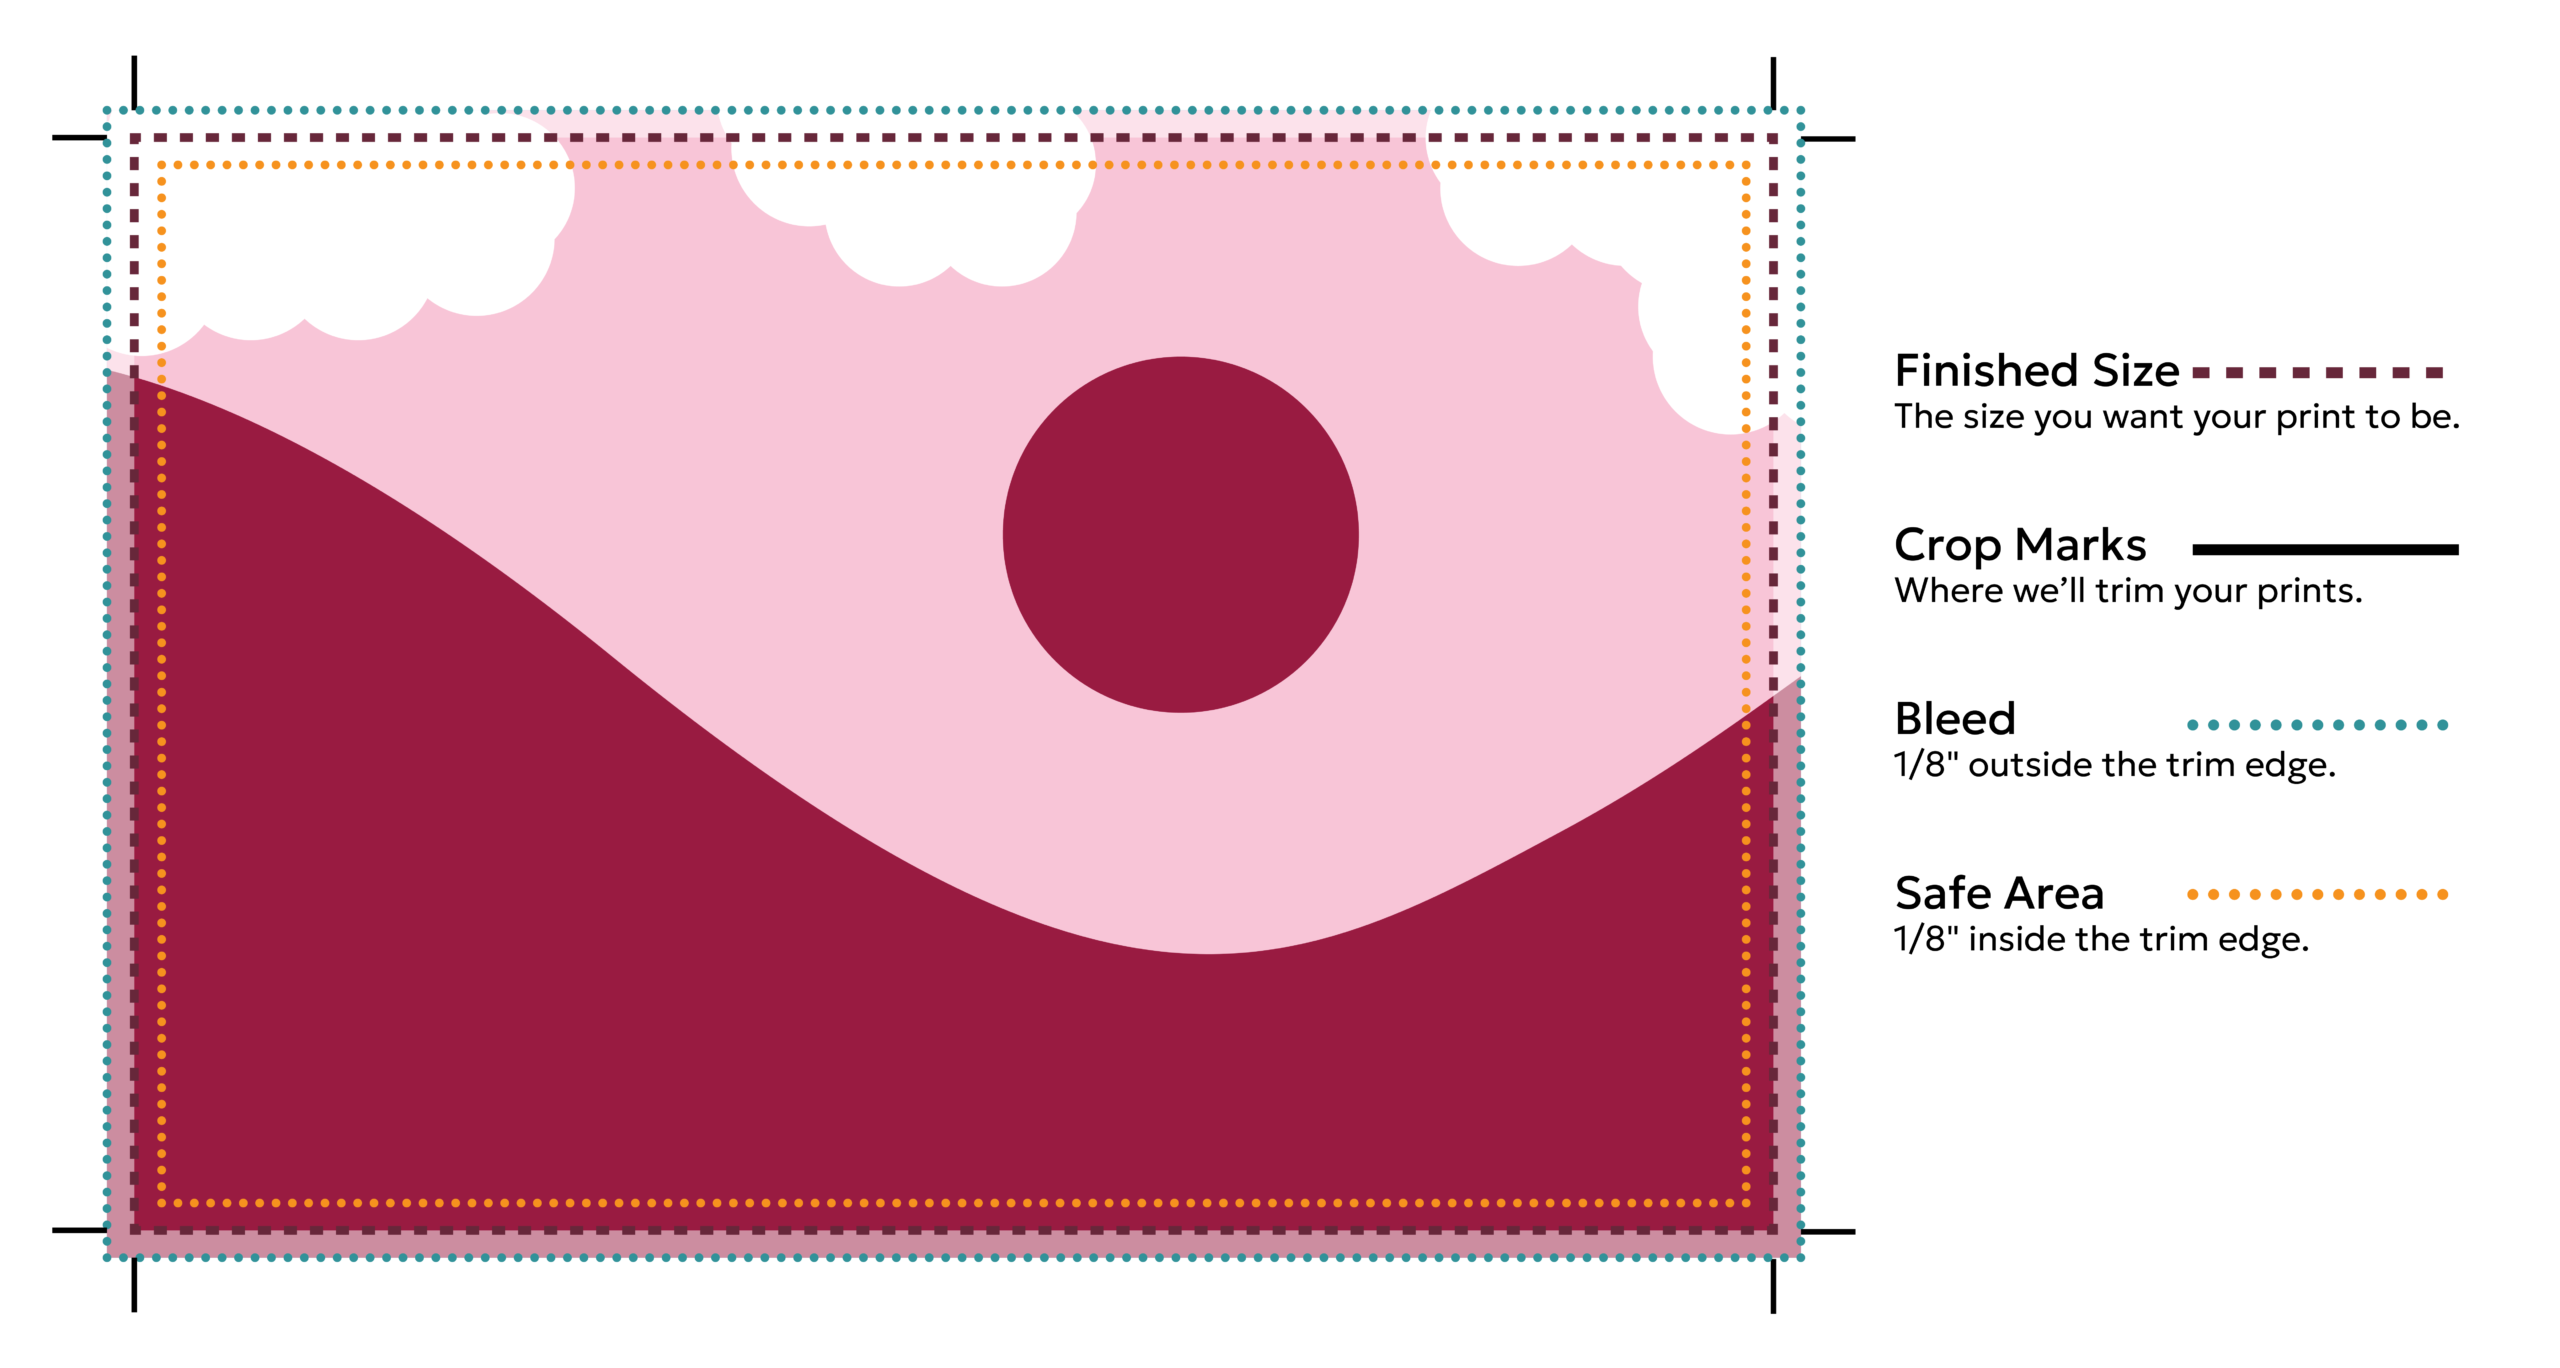
Crop Marks
Two small marks in each corner of your design to let us know where to trim.
Bleed
Your design extends 1/8” beyond the finished size. This ensures that any color or images will extend to the edge of the paper.
Safe Area
Keep important text, logos and critical information at least 1/8” inside the finished trim edge.
How to Add Crop Marks & Bleed
If your print extends to the edge of the page, you need to add Crop Marks and Bleed so we can trim at the correct place. Different design software has different export options. We’ve added export instructions for some of the most popular software our clients use.
Canva
Export your file as a Print-Ready PDF from Canva in a breeze!
1. Select Share
2. Select Download
3. In the Download Window
a. Set the File type to PDF
b. Set the Presets to Print
c. Set Color profile to CMYK
NOTE: You will need Canva Pro to export in CMYK. We can use a file exported in RGB but the colors may shift slightly when printed.
d. Select the page(s) you want to export
NOTE: Your options are: All, This page (1), or a Custom Selection
e. Select the Advanced Settings dropdown
i. Toggle Crop marks and bleed on
4. Select Download
Adobe Illustrator
To export from Adobe Illustrator, navigate to the Export Window using the following path:
1. Select File>Export>Export As…
Set the document Format to Adobe PDF (pdf)
2. In the Export Adobe PDF Window:
Select the Adobe PDF Preset: [High Quality Print]
Go to the Marks and Bleeds Window
In the Marks section:
Select the Trim Marks checkbox ☑
Set the Offset to .125″
If you have a custom bleed, please set the Offset to that size instead
In the Bleeds section:
If your file was set up with a specific bleed, select the Use Document Bleed Settings checkbox ☑
OR
If your file was not set up with a specific bleed, set the Bleeds to .125″ on all sides
3. Select the Export button
Adobe InDesign
To export from Adobe InDesign, navigate to the Export Window using the following path:
1. Select File>Export…
Set the document Format to Adobe PDF (Print)
2. In the Export Adobe PDF Window:
Select the Adobe PDF Preset: [High Quality Print]
In the General section:
Confirm the Pages Export as toggle is set to Pages NOT Spreads
Go to the Marks and Bleeds Window
In the Marks section:
Select the Trim Marks checkbox ☑
Set the Offset to .125″
If you have a custom bleed, please set the Offset to that size instead
In the Bleeds section:
If your file was set up with a specific bleed, select the Use Document Bleed Settings checkbox ☑
OR
If your file was not set up with a specific bleed, set the Bleeds to .125″ on all sides
3. Select the Export button
Adobe Photoshop
You CANNOT natively export from Adobe Photoshop with Crop Marks and Bleed. The best process we have found is as follows:
1. In Photoshop, resize the Canvas to add .125″ on each side
a. Go to Image>Canvas Size…
b. Set the Anchor to the center point
c. Add .25″ to the Width and Height
2. Extend the artwork to fill the resized canvas
3. Export the file as a Photoshop PDF
a. Go to File>Save As…
b. Set the Format to Photoshop PDF
c. Set the Adobe PDF Preset to [High Quality Print]
d. Click the Save PDF button
4. Import the file in Adobe InDesign
a. Size the file according to your desired finished size and set the Bleed size to .125″
b. Center the PDF on the page and confirm the original lines up properly
5. Follow the Adobe InDesign export instructions above
Still Have Questions or Need Help?
Give us a call (410) 727-1400 or send us an email production@alphagrap.com! We can answer your questions and give more detailed instructions for your specific files.
Short on time and need something fixed? Not to worry! Our team can prepare your files for you—starting at $45.
Affiliations & Certifications